| 일 | 월 | 화 | 수 | 목 | 금 | 토 |
|---|---|---|---|---|---|---|
| 1 | 2 | 3 | ||||
| 4 | 5 | 6 | 7 | 8 | 9 | 10 |
| 11 | 12 | 13 | 14 | 15 | 16 | 17 |
| 18 | 19 | 20 | 21 | 22 | 23 | 24 |
| 25 | 26 | 27 | 28 | 29 | 30 | 31 |
- nomadcoders
- K디지털기초역량훈련
- bucket list
- react
- object-oriented programming
- CSS
- 객체지향
- REACT강의
- 버킷리스트
- 패스트캠퍼스
- 무료리액트강의
- 노마드코더
- 내일배움카드
- HTML
- 자바스크립트
- class
- 코딩
- 국비지원
- free react course
- 반응형 이메일
- 이메일 코딩
- React & Redux로 시작하는 웹 프로그래밍
- ENFJ포스팅
- ENFJ
- 반응형
- 리액트
- redux
- 바이트디그리
- JavaScript
- Today
- Total
미미 공부/취미방
[패스트캠퍼스:4주차] React & Redux로 시작하는 웹 프로그래밍 : react 강의 1~2/4 본문

4주차.Chapter 1
이미지 시간차로 나타나기
애니메이션 라이브러리 사용

forEach로 선택한 4개의 .fade-in요소에 익명 함수 코드를 반복한다.
라이브러리에서 제공하는 delay 속성으로
fade-in 1은 0.7,
fade-in 2는 1.4,
fade-in 3은 2.1,
fade-in 4는 2.8초 뒤에 순서대로 opacity가 1로 바뀐다.
공지사항
공지사항 자동으로 넘어가기
swiper 라이브러리
https://swiperjs.com/get-started
Getting Started With Swiper
Swiper is the most modern free mobile touch slider with hardware accelerated transitions and amazing native behavior.
swiperjs.com
다른 라이브러리들처럼 링크로 라이브러리 연결을 하는데,
swiper는 script 말고도 css 링크도 연결을 해 줘야 한다.
연결 후에는,
Demo에서 사용할 형태의 슬라이드를 찾고 "Core"라는 버튼을 클릭하면
CodeSandbox에 구현해 놓은 코드가 나타난다.
이 페이지를 참고해서 각 HTML, CSS, Javascript 코드를 넣으면 된다.
Swiper Demos
Swiper is the most modern free mobile touch slider with hardware accelerated transitions and amazing native behavior.
swiperjs.com
swiper를 사용하는데 주의해야 할 점이 있다면,
HTML 구조와 class명이 제대로 들어가야 하고
.swiper-wrapper는 반드시 높이값을 갖고 있어야 하고
js에 해당 swiper 코드가 잘 들어가 있어야 한다.
**패캠 강의에서는 .swiper-container가 최상위 부모지만
최근 swiper 버전에서는 swiper로 클래스명을 변경했다.**
swiper의 스크립트 코드에 다양한 API를 제공하는데,
자세한 내용은 아래 링크에서 확인이 가능하다.
https://swiperjs.com/swiper-api
Swiper API
Swiper is the most modern free mobile touch slider with hardware accelerated transitions and amazing native behavior.
swiperjs.com
자주 사용하는 옵션은 아래에 들어있는 정도 되는 것 같다.
new Swiper('.promotion .swiper', {
  slidesPerView: 3, // 화면에 보여지는 슬라이드 개수
  spaceBetween: 10, // 슬라이드 사이 간격
  centeredSlides: true, // 메인 슬라이드 센터에 위치하기
  loop: true, // 슬라이드 반복
  autoplay: { // 슬라이드 자동 넘어가기
    delay: 5000 // 5초마다 넘어가기
  },
  pagination: { // 슬라이드가 몇 개 있는지 표시
    el: '.promotion .swiper-pagination',
    clickable: true // 표시 클릭해서 해당 순번 슬라이드로 이동 가능
  },
  navigation: { // 이전후 슬라이드로 이동할 수 있는 버튼
    prevEl: '.promotion .swiper-prev',
    nextEl: '.promotion .swiper-next'
  }
});
크기를 자동으로 계산해 주는 CSS 함수
calc() 함수
수학 공식만 잘 넣으면 알아서 계산을 해준다.
**수학 기호 양 옆으로 띄어쓰기 필수**
예. width: calc(819px * 3 + 20px); width: calc(100% - 20px);
width: calc(100px/2.3) - 동작하지 않는다.
또 다른 position 중앙 배치 방법
position: absolute/fixed를 주고 가로 값으로 크기를 정하고
left: 50%; 해서 요소 왼쪽 끝이 가로(왼쪽 기준) 50% 이동하고
margin-left: -요소가로값 / 2;로
요소를 다시 끌고 오는 방법.
(right: 50%;인 경우는 margin-right)

중앙정렬요소 {
    width: 700px;
    position: absolute;
    left: 50%;
    margin-left: -350px;
}
Boolean 값 반대로 할당하기
Boolean 값(true/false)을 반복적으로 바꿔야 할 때가 있는데,
쉽게 값을 다시 할당하는 방법
//값을 다시 할당해야 하니, const로 변수선언을 하면 안됨
let testBoolean = false;
let someEl = document.querySelector('.something');

someEl.addEventListener('click', function() {
	testBoolean = !testBoolean;
});
testBoolean = !testBoolean;
'!'는 부정/반대를 뜻해서,
해석하자면 false(testBoolean) = 반대/부정 false(즉 true).
true = !true (즉 false);
그래서 해당 코드는 someEl를 클릭할 때마다 testBoolean의 값이 반대로 바뀐다.
4주차.Chapter 2
일정한 비율로 영역 조절하기
- 부모의 가로 값을 px로 설정한다.
- 자식에 padding-top을 %로 입력한다.
그러면 부모 가로 값을 기준으로 자식의 padding 값이 % 비율대로 늘어난다.
부모의 가로 값을 수정할 때마다, 자식의 padding 값도 자동으로 같이 변경된다.
<style>
    .parent {
    	width: 500px;
    }
    .child {
    	padding-top: 50%;
    }
</style>

<div class="parent">
    <div class="child"></div>
</div>

//가로 500px 세로 250px이 된다.
Youtube Iframe API
Youtube에 있는 동영상을 불러오고, 동영상을 제어할 수 있다.
https://developers.google.com/youtube/iframe_api_reference
iframe 삽입에 대한 YouTube Player API 참조 문서 | YouTube IFrame Player API | Google Developers
Embed a YouTube player in your application.
developers.google.com

tag라는 변수에 'script'라는 요소를 만들어 담는다.
<script></script>
tag변수가 담고 있는 요소에 src 속성과 그 값을 넣는다.
<script src="https://www.youtube.com/iframe_api"></script>
firstScriptTag라는 변수에 사이트 내부에 [0] 번째 script 태그를 찾아 넣는다.
firstScriptTag의 부모태그 내부에 tag변수가 담고 있는 요소를 firstScriptTag변수가 담고 있는 요소 이전에 넣는다.
videoId : 유튜브 동영상 주소 마지막에 들어가 있는 부분
playerVars : 다양한 옵션
events.onReady : 동영상이 준비되면 실행할 익명 함수
더 자세한 옵션은 아래 링크에서 확인 가능
https://developers.google.com/youtube/player_parameters
YouTube 내장 플레이어 및 플레이어 매개변수 | YouTube IFrame Player API | Google Developers
YouTube 내장 플레이어 및 플레이어 매개변수 개요 이 문서에서는 애플리케이션에 YouTube 플레이어를 삽입하는 방법을 설명하고 YouTube 내장 플레이어에서 사용할 수 있는 매개변수를 정의합니다. I
developers.google.com
gsap 옵션
애니메이션 라이브러리에 대한 자세한 옵션 링크
https://greensock.com/get-started/
Getting Started with GSAP
The GreenSock Animation Platform (GSAP) animates anything JavaScript can touch (CSS properties, SVG, React, canvas, generic objects, whatever) and solves countless browser inconsistencies, all with blazing speed (up to 20x faster than jQuery). See why GSAP
greensock.com
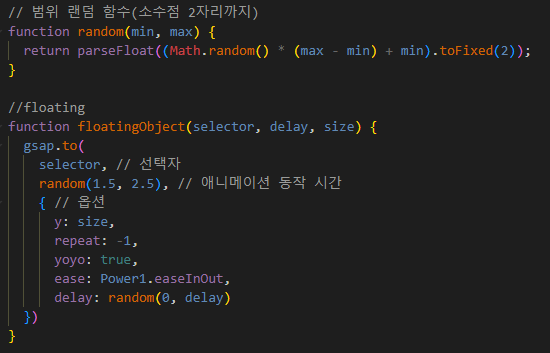
y : 위, 아래로 움직이는 범위
repeat : -1 무한반복
yoyo: true 동작이 끝나면 되감기
ease: Power1.easeInOut 사이트 내에서 easing 스타일을 선택해서 해당 스타일의 속성 값을 가져와서 쓸 수 있다.
delay: 애니메이션이 끝나고 해당 시간 동안 휴식
라이브러리 활용이 이렇게 유용하고 복잡하고 다양하다니...
매번 vanilla javascript로 하려고 고집부렸던 과거의 나...🤦♀️
라이브러리도 잘 활용해 봐야겠다.
'Programming' 카테고리의 다른 글
| [패스트캠퍼스:4주차] React & Redux로 시작하는 웹 프로그래밍 : react 강의 4/4 (0) | 2022.07.19 |
|---|---|
| [패스트캠퍼스:4주차] React & Redux로 시작하는 웹 프로그래밍 : react 강의 3/4 (0) | 2022.07.14 |
| [패스트캠퍼스:3주차] React & Redux로 시작하는 웹 프로그래밍 : react 강의 5/5 (0) | 2022.07.11 |
| [패스트캠퍼스:3주차] React & Redux로 시작하는 웹 프로그래밍 : react 강의 3.5 ~ 4/5 (0) | 2022.07.09 |
| [패스트캠퍼스:3주차] React & Redux로 시작하는 웹 프로그래밍 : react 강의 3/5 (0) | 2022.07.08 |


